So far, we've created notes and combined notes to produce new content. Then we've taken a structured look at linking those notes to other notes to start a dialogue with ourselves.
Is this process good thinking?
I propose it is an excellent start, but there are some missing pieces.
A thinking process usually happens over time and the best thinking usually happens over long spans of time. We come back to an idea more than once and deepen our understanding, improve our expression, or see connections previously hidden.
Instead of re-writing our notes every time they change, I propose to keep everything in a single note. To manage the potential chaos, we'll use section headings to keep things compartmentalized.
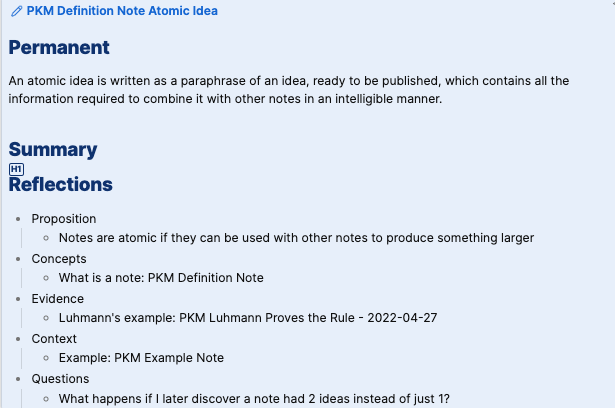
To do so I use three sections in all of my notes1:
- Permanent
- Summary
- Reflections
Permanent Section
The Permanent section should always contain material ready for publication. This is the content we discussed in detail in the last instalment of this guide. I keep this at the top of my note so I never have to dig for it.
Summary Section
I use the Summary section for two things. I keep a copy of a direct quote from material I've consumed or my original rough-draft thinking that isn't ready for prime time.
Usually, there is just a single quote. In rare cases, I might bring together content from two or even more sources because they come together in an idea I want to express in the Permanent section. Sometimes the Summary section holds an outline or rough draft.
In the special case of research notes, the Summary contains many quotes. We'll talk about how to organize that effort in the next instalment of this guide.
Finally, the Reflections section is where I keep links to other notes.
Example, please!
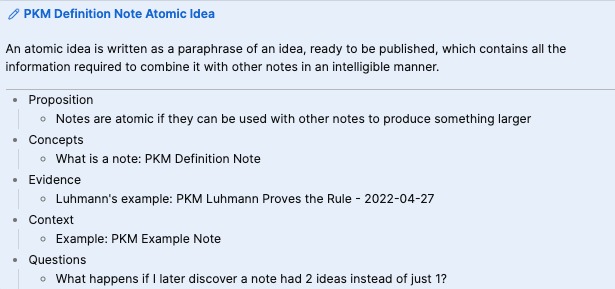
Let's go back to our previous note about atomic notes which in the last instalment looked like this:

Notice how I used the horizontal line to separate my main content from my reflections and links. Let's add in our sections to see how it looks.

Linking to Sections
Digital note taking tools allow you to link notes together.
Obsidian creates links using a wikilink style: [[PKM Definition Note Atomic Idea]].
Obsidian links can also link to sections inside notes.
The key to remember is that just like Markdown creates sections with a # at the beginning of a line, linking to sections uses the # at the end of the filename in the link.
Linking to the Permanent section of our note looks like this:
[[PKM Definition Note Atomic Idea#Permanent]]
One benefit of this scheme is that you can jump directly to the relevant section when clicking.
But there's a much bigger benefit.
Revealing specific content.
Put a ! in front of an Obsidian link and the content of the note appears embedded where the link is.
So, ![[PKM Definition Note Atomic Idea#Permanent]] isn't just a link to a particular place, it reveals the Permanent section content.
When I'm creating a draft of new material, I use this a lot. I create an outline which includes links to notes I think will be useful. Then I do one search and replace to create links to the publishable content in the Permanent section of those notes and a second search and replace to reveal that content.
In two steps, my outline comes to life as a first draft!
Let's see an example by revisiting our letter from the first instalment of our guide.
Remember, we had the following three notes.
PKM Definiiton Note
PKM Definition Note Atomic Idea
PKM Example Note
And instead of our previous draft, I'm going to use note links as placeholders.
Placing these links in reality is easy: drag them in from the left sidebar from either search results or the navigation browser.
Or, open [[,
start typing and a pop-up window will show a set of notes you can choose from.
To whom it may concern,

I am delighted to tell you about this note taking system I'm learning.
It all starts with a note.

[[PKM Definition Note]]

[[PKM Definition Note Atomic Idea]]
[[PKM Example Note]]

Your faithful servant,
…
Here's the same note ready to reveal the Permanent sections.
To whom it may concern,

I am delighted to tell you about this note taking system I'm learning.
It all starts with a note.

![[PKM Definition Note#Permanent]]

![[PKM Definition Note Atomic Idea#Permanent]]
![[PKM Example Note#Permanent]]

Your faithful servant,
…
With the content revealed, it's easy to move the links up or down to re-arrange where it will best fit because it's just one line.
When ready to create the draft, copy and paste or drag and drop can quickly transfer the content from one to your draft.
On MacOS, holding the cmd key when mousing over the link will open a pop-up window where you can edit and select raw text.
"Never" Throw Anything Away
A creative axiom is, "Never throw anything away." When building innovative solutions to problems, yesterday's trash becomes tomorrow's treasure surprisingly often.
I place "never" in quotes because taking a rule of thumb like this to unhelpful extremes fails us. There's no need to keep every draft. There's no need to keep every spelling mistake or typo.
Using the three sections for your notes helps keep previous versions or early forms of thinking. But it's best not to go crazy.
Compromising between keeping nothing and keeping everything, I create a "Moved Aside" section as needed in my notes. Anything which seems promising, but not directly related to the current writing project, goes into that section. While mostly dross, sometimes there I find useful nuggets for later use and incorporate them into another part of the manuscript or split them out into their own notes.
A Note Template
While beyond the scope of this MVP guide to note taking, let's talk about templates. When all notes have the same starting structure, you can gain a lot of efficiency by creating a template. This is the MVP version of the template I use2…
# Permanent

# Summary

#  Reflections
- Propositions
- Concepts
- Evidence
- Context
- Questions
Obsidian, like many other tools, has template functionality built in. I use it for specific use cases we'll discuss in a later part of this guide, but strongly recommend getting a good text expander.
Templates in Obsidian increase efficiency. But they're useful only inside the one tool. A text expander allows you to create templates and other snippets you can use anywhere.
If you don't use a text expander, you're losing a lot of your life to meaningless typing!
-
Headings in Markdown are created by adding
#at the front of any line you want to be a heading. 1 for a level 1 heading, 2 for a level 2 heading, and so on, up to level 6. ↩ -
For full transparency: my full template has a bit of extra metadata (i.e. information about the information in the note). Honestly, the more notes I create, the less I use that metadata, so deliberately left it out. ↩
